
Use this menu option to allow the system to recognise the format of postal codes for various countries.
After choosing this option the following form will be displayed:
Country code: Enter the country code to which the format is to pertain in this field. Enter a "*"(star) for the country in which the system is installed.
Postal code format: Enter the format for the postal code in the country indicated. Enter a string consisting of one or more of the codes in the table below. Enter the codes in the sequence to be included in the postal code.
|
Code |
Meaning |
|
nA |
the postal code contains letters, by which n indicates the number of letters |
|
nN |
the postal code contains digits, by which n indicates the number of digits |
|
n "character(s)" |
the postal code contains specific characters, by which n indicates the number of times that the character occurs and by which the characters are preceded and followed by "" (quotation marks) |
When the information has been entered, an overview screen will be displayed.

Select this option to enter a new format. When you select this option, an input screen will be displayed. This screen is explained above.
Select a format and then this option to modify the format of the postal code.
:Select a format and then this option to delete the format.
Borrowers can be sent an accept giro for payment of the membership fee. This principle is explained in detail in the description of AFO 451. In simplified form, the principle is as follows: accept giros are sent to all borrowers whose membership cards expire in the month for which accept giros are being sent.
This automatic principle can be influenced. The borrower record includes an 'AC' (accept giro) sub-field with the membership fee data for this purpose. If a code is entered in this field, no accept giro (or direct debit order) is sent to this borrower.
Use this menu option to define the applicable codes.
Entering a code in the AC field also affects the automatic renewal of the validity of a membership card. See also the description for AFO 451.
After choosing this option the following form will be displayed:
Code: Enter an accept giro code in this field.
Note
This code may consist of a maximum of four characters.
Explanation (+ automatic renewal/open subscription): Enter the three parameters in the table below in this field. Separate the description and the other two parameters using a "#" (number sign). The other two values are not to be separated but entered directly after one another.
|
No. |
Meaning |
Comment |
|
1 |
Description of the code |
|
|
2 |
Renewal of the membership card |
"0" (zero) if the membership card is not to be automatically renewed; "1" (one) if it is |
|
3 |
Create membership fee |
"0" if no membership fee is to be created in the relevant batch process, "1" if it is to be created |
Note
If no indications are included in the descriptions, a value of "00" is automatically assigned. This means that the card is not automatically renewed and no membership fee due is created.
When the information has been entered, an overview screen will be displayed.

: Select this option to define a new accept giro code. When you select this option, an input screen will be displayed. This screen is explained above.
Select an accept giro code and then this option to modify the meaning of the code.
:Select a code and then this option to delete the code.
In most systems you will allow borrowers registered at one location to borrow from other locations. However, you can restrict where borrowers are allowed to borrow from. For each location, you can define which locations borrowers can borrow from.
After choosing this option the following form will be displayed:

Enrolled in: Enter the location where the borrower is registered.
Permitted to borrow in: Enter one or more locations in this field, separated by a "," (comma), where the borrower may loan items. Use the formats indicated below:
|
"[Institution code]"/"[location code]" |
the borrower may loan items at this location |
|
"[Institution code]"/"*"" |
the borrower may loan items at all locations within the institution |
|
* |
the borrower may loan items at all locations within all institutions |
Enter a message to be displayed at the point in time when a borrower in the relevant borrower category is identified.
When the information has been entered, an overview screen will be displayed:

: Select this option to enter a new authorisation. When you select this option, an input screen will be displayed. This screen is explained above.
:Select an authorisation and then this option to modify the locations where the borrower may loan items.
:Select an authorisation and then this option to delete the authorisation.
Use this menu option to enter a message to be displayed in nearly all circulation AFO's for borrowers in the relevant borrower category.
After choosing this option the following form will be displayed:

Borrower category: Enter a valid borrower category.
Message: Enter a message to be displayed at the point in time when a borrower in the relevant borrower category is identified.
When the information has been entered, an overview screen will be displayed.

: Select this option to enter a new message. When you select this option, an input screen will be displayed. This screen is explained above.
:Select a message and then this option to modify the message.
:Select a message and then this option to delete the message.
With this option you can specify in which locations items from other locations may be processed.
After choosing this option a submenu will be displayed:

The parameters are similar for all four options. But the authorisations can be different for each function.
After choosing an option the following form will be displayed:

Location: Enter the location to which to authorisation applies.
May process objects belonging to location(s): Add one or more locations of which this location may process items. Separate the locations by a “,”(comma).
When the information has been entered, an overview screen will be displayed.
: Select this option to enter a new code. When you select this option, an input screen will be displayed. This screen is explained above.
:Select a code and then this option to modify the code.
:Select a code and then this option to delete the code.
A 'subscription type' can be linked to each borrower record. This type can be used to specify two parameters: the duration and loan conditions pertaining to the maximum quantities.
In order to specify the latter, a table can be defined in AFO 482. In this table, combinations of borrower categories and subscription types can be defined. Special loan conditions with reference to maximum quantities are then applicable to the combinations included in the table; the actual maximum quantities are defined using AFO 481 ('Circulation parameters: general').
After choosing this option the following form will be displayed:

Borrower category/membership type Enter a borrower category and a subscription type, separated by a "/" (slash).
Note
Only one alternative maximum can be defined per borrower category.
Wording: Enter a description of the alternative maximum in this field.
When the information has been entered, an overview screen will be displayed.

: Select this option to enter a new alternative maximum. When you select this option, an input screen will be displayed. This screen is explained above.
:Select a maximum and then this option to modify the maximum.
:Select a maximum and then this option to delete the maximum.
Membership cards can be automatically blocked. In order to do so, a batch process can be periodically started automatically using AFO 451 ('Prepare print functions and borrower-related batch jobs') that checks all borrower records and automatically blocks or unblocks them.
See also AFO 431 ('Borrower administration') for an explanation of automatic blocking and for a comparison with the other blocking possibilities, and AFO 451 ('Prepare print functions and borrower-related batch jobs') for more information about the batch process. Using AFO 482, the various criteria to be applied for automatic blocking can be defined. You can define this separately for WebOpac, telephone messages and SelfCheck.
If the option "in use" is NOT checked for WebOpac, telephone messages or SelfCheck, the General settings are applied here too.
After choosing this option a submenu will be displayed:
The various criteria that can be applied to automatically block borrowers are displayed in this screen.
Select the desired criterion from this overview. The method is the same for all of the criteria.
After a selection has been made, an input form will be displayed
For borrower category: Enter the parameters for each borrower category, separated using a "/" (slash).
· Enter the value of the block, such as the amount of fines after which you want to block the borrower. This can be as little as 0.01. This value is entered as ‘.01'. Amounts such as 10.00 can be entered as ‘10'.
· Enter the type of block.
- 0 = anyone can cancel the block. The system displays the reason for the block and prompts you to cancel the block or not.
- 1 = block can be cancelled with password override. The reason for the block can be viewed in AFO 431.
- 3 = the block cannot be cancelled.
· Enter 0 (parameter for future use)
The above parameters are to be set for the general tab. Example for Period after sending overdues: 2,7/2/0 to set a block with password override 7 days after the second overdue has been sent. If you use any or all of the self-service products, you can enter different block values for those. However the second and third parameters on self-service tabs for override settings are omitted. Example for Period after sending overdues: 2,14 to set a block 14 days after the second overdue has been sent.
The blocking options are as follows:
:
|
Criterion |
Block value |
Example |
|
Overdue fines (Items have been returned or renewed, but fines due have not yet been paid). |
Amount |
12.50 |
|
Current fines (Items are on loan and overdue, and fines for items returned today would be due). |
Amount |
7.50 |
|
Overdue + current fines |
Amount |
20 |
|
Acceptgiro sent |
0/1/2 comma number of days |
1,7 |
|
Expired membership |
number of days after exact date number of days after the last date of the previous month |
7 +7 |
|
Overdue items |
number of days |
30 |
|
Outstanding payment overdue (Any payment that is overdue). |
number of days |
30 |
|
Abnormal returns |
Quantity |
20 |
|
Total amount due (All amounts due, including Membership fees). |
Amount |
30.00 |
|
Outstanding fines overdue (Items have been returned or renewed, but fines due have not yet been paid). |
number of days |
60 |
|
Period after sending overdues |
Overdue notice 1, 2, 3 or 4, a comma, then the number of days since generation of that notice |
3,7 |
|
Invoice status |
This functionality is not in use |
|
|
Items returned too late |
number of days |
7 |
|
Outstanding loan fees |
amount |
2.00 |
|
Outstanding payment overdue, minus membership fees |
amount |
10.00 |
Notes
· Acceptgiro sent
- Enter the number of days after which an accept giro has been sent after which the borrower is to be blocked. The accept giro is defined as "0" (actual accept giro), "1" (first reminder) or "2" (second reminder).
· Expired membership
- Calculation of this block is related to the last day of the month in which the membership card expires OR to the exact date within the month on which the membership card expires.
Example
If the borrower's membership card expires on August 17 and you enter "7", the block will be effective from August 24, this being 7 days after the exact expiry date within the month of August. If you enter +7 the block will start on 7 September, this being 7 days after the end of the month of August.
· Total amount due and Outstanding payment overdue
- These only block for amounts generated and showing in AFO 414 i.e current fines are excluded.
· Period after sending overdues
- Specify the number of days after which reminder has been sent that the borrower is to be blocked. The reminder is indicated by means of a “1”, “2”, “3”, or “4” (first, second, third or fourth reminder).
· Items returned too late
Blocks based on this criterion are considered exceptional cases. Unlike the other types of blocks, this block is created on-line, not based on a batch process in AFO 451 and is re-evaluated as part of the standard block check when the borrower record is assessed for loans, renewals, and reservations. Also unlike other block values, this type is either ON if there is a numeric value in the table or OFF if the value in the table is null or not defined. The function of this block is as follows:
- The parameters for Items returned too late is not reversible by changing the values then re-executing the Block Borrower function in AFO451. Instead it is set online as items are returned and cannot be reset. Closed days between the original due date and the actual return date are not taken into consideration. Any repeat violations do not have a cumulative effect; in other words, each return of items by which the due date has been exceeded will result in the calculation of the block period, by which the longest block period is applied.
Example
If this his block set to 120, a borrower returns an item which is now 125 days overdue, the borrower is blocked for another 125 days. If borrower returns item 200 days overdue, the borrower is now blocked for the next 200 days.
Below is an explanation of how to set block type 13 ("Items returned too late") and what the subsequent behaviour of the system is.
|
AFO482 - Borrower Blocks / items returned too late |
The value here is any numeric value / 1/ 0 (i.e. 1/1/0 and 999/1/0) or null. If there is any value entered into the matrix, then the block is ON. If the value is null, the block is not applicable for the borrower category / location. Any numeric value entered means the block is ON, the numeric value itself is NOT a limit. The number of days you are blocked is determined by the difference (not including closed days) between the return date and the original due date. The general level setting is applied to the other levels (WebOpac, SelfCheck, Telephone Messaging) only if the other levels are NOT defined as in use. If the other levels are defined as in use, the any null value will be ignored for block setting, any other value will be assumed active. |
|
AFO481 – WebOpac - Active Block Types |
If this is defined as in use, then ONLY the block types listed are used for the setting of blocks. If Block type 13 is in use and Active, then the system will look at the 482 Block parameters – tab WebOpac settings first. If these are in use, then they are applied as defined. If they are NOT in use, then the general settings are used. |
|
AFO481 – Miscellaneous - Circulation Workflow - Borrowers - Block types |
As with all blocks, it is applicable ONLY if the block is in the right hand (active) column. |
|
Setting the block |
A block is placed on the borrower during returns (AFO412) or if item is loaned to a different borrower in AFO411. The block duration is the longest period during the return session if multiple items are returned. Example: if you have an item 3 days overdue, and one 10 days overdue, the block period is 10 days from today. Block duration does not take into account closed days (regular or variable). If a Block type 13 is currently set on the borrower record (e.g. For 3 more days) and additional items are returned with longer overdue periods the block is NOT recalculated. A Block is placed on the levels defined as active / with values in AFO482 – Block parameters - Items returned too late. Once again, if the subsidiary tabs are in use, then the values on those tabs are used. If they are not designated as in use, then the General settings are applied to all levels. |
|
Clearing / Resetting the block |
Resetting the block is done when the borrower block status is checked. The system will now go through all 4 levels to see if current block (when defined) needs to be reset. Access points for block check are: Circulation functions such as AFO's 411, 413, 416, 419, 421, etc. where the block level is checked WebOpac functions: Place reservation and User activities / Renewals. |
Other Notes:
AFO451 does NOT look at these levels at all for Block 13 – Items returned too late
· If the date for expiry of the block = today or in the future: Borrower is blocked.
· If the date for expiry of the block = yesterday or in the past: Block is removed.
When setting the AFO482 Block parameters, the second value is used (overridable or not overridable).
The WebOpac does NOT check the block value / determine active update when displaying personal information (i.e. to see if Change data button should be ON) or when Logging in to User activities (i.e. to see if Alerting services should be on). It is only checked / possibly cleared when the user attempts to create a new reservation or renew item(s) currently on loan.
· In case there are more than 15 borrower categories, there will be a button to go to the next screen.
· The button allows you to go directly to a specific borrower category.
If you so desire, the system can calculate a registration fee (again) when a borrower changes borrower category as a result of a borrower category update (in AFO 451). This menu option can be used to define the categories for which a registration fee is charged in the event of an update. See the explanation for ‘Registration fee' in AFO 431 (‘Borrower administration') for more information..
After choosing this option the following form will be displayed:

Borrower category: Enter the borrower category. This pertains to the category to which the borrower belongs after the automatic update (in other words: the new category).
Note: Enter any comments in this field.
When the information has been entered, an overview screen will be displayed.
: Select this option to enter a new borrower category.
Select a borrower category code and then this option to update the comment.
:Select a category code and then this option to delete the category.
After choosing this option the following form will be displayed.

Acronym: Enter a code.
Note: Enter a free text description.
When codes already have been defined, an overview screen will be displayed.

: Select this option to enter a new code. When you select this option, an input screen will be displayed. This screen is explained above.
:Select a code and then this option to modify the code.
:Select a code and then this option to delete the code.
You can assign these codes in AFO 431 in either Maintenance or Circulation Note fields. Once you save the field, the full description will be displayed in the note field of the borrower record and any other place in the application where such note fields appear.
This menu option can be used to define a fee per borrower category for returning items at a location other than the location where the item was lent.
After choosing this option the following form will be displayed.

Borrower category: Enter the borrower category.
Amount: Enter the amount to be paid when an item is returned at another location.
When amount have already been entered, an overview screen will be displayed.
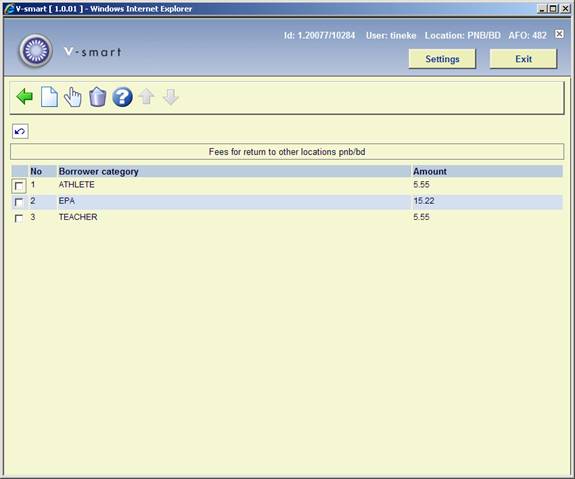
: Select this option to define a new borrower code and an amount.
:Select a borrower code and then this option to update the amount.
Select a borrower code and then this option to delete the code and the amount.
Note
In order to activate these fees, the option for Fee for return to a different location must be set to 1 in AFO 481 – Misceallaneous – Circulation Workflow – Returns.
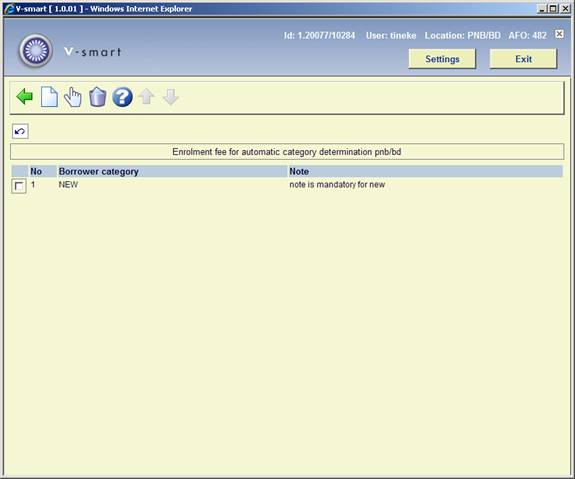
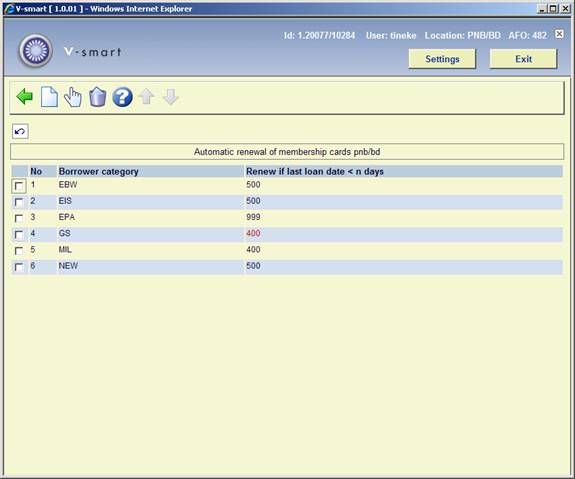
This option can be used to indicate that the membership card for a certain borrower category is to be automatically renewed on the expiration date if the borrower has lent an item in the past n days. This option can be used, for example, to identify non-paying members who have moved or who no longer use the library.
After choosing this option the following form will be displayed:
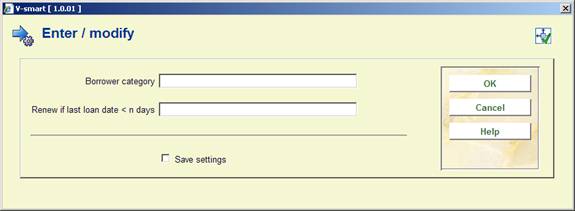
Borrower category: Enter the borrower category.
Renew if last loan date <n days In this field, enter the number of days prior to the expiration date within which a borrower must have lent an item in order to automatically renew the membership card.
When codes have already been defined, an overview screen will be displayed.
: Select this option to enter a new borrower category and a new number of days.
Select a borrower code and then this option to update the number of days.
:Select a borrower code and then this option to delete the code.
Note
If you want to use this, it needs to be defined for ALL borrower categories for which no membership fee is charged. Even if only a single category needs to be actually renewed automatically. You can enter 0 for the other categories.
This needs to be defined for each location.
After choosing this option the following form will be displayed:

Postcode table activated: use this option to indicate whether or not a postcode table is active. This only applies to a Dutch post code table, which needs to be imported (non-interactive).
Postcode can contain multiple places: This option relates to AFO 482 – Postcode table. When this option is ON, it allows you to enter multiple cities related to a single postcode (see next section).
Disable house number: When adding a new borrower in AFO 431 and the Post code table is ON, this option can be used to control whether or not the field house number is displayed on new records.
This table contains the manually defined postcodes. After selecting this option an overview screen will be displayed:

: Use this option to add a new definition. See section 482.21.1 for details.
: Select a line and then this option to view/modify the details of a definition. See section 482.21.1 for details.
: Select a line and then this option to delete the definition.
After selecting the option or an input form will be displayed.
When the parameter Postcode can contain multiple places in AFO 482 – Postcode activated is OFF, the input form will look like this:

You can associate a single city with the postcode.
When the parameter Postcode can contain multiple places in AFO 482 – Postcode activated is ON, the input form will look like this:
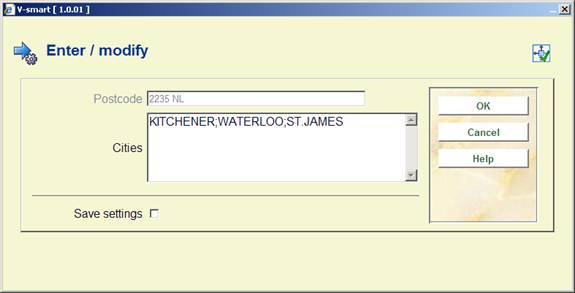
You can associate multiple cities with the single postcode. They must be separated with a semicolon (;).
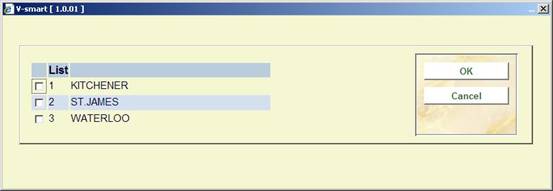
When entering a new borrower in AFO 431 input a post code in the brief entry form. On the next form there is a List button available next to the Place/city/town field. Clicking on this button will bring up the list of cities associated with the post code entered:
![]()
When modifying the address details of a borrower in AFO 431, the List button will also be available next to the Place/city/town field of the borrower's Home address.
With this option you can specify how phone numbers must be entered in a borrower's record. If nothing has been defined here, phone numbers can be entered in any format.
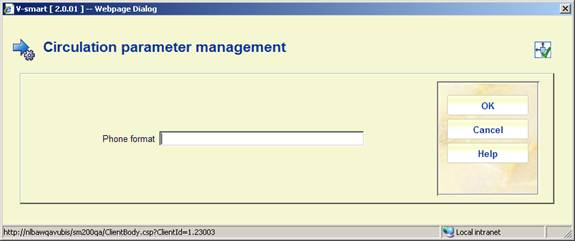
The following values are valid:
· .N(.iN1” “).1(jN1” “)kN
· .1(iN1” “).1(1”0”.jN1””)kN
· .1(.iN1” “).1(1”0”jN1” “)kN
where i,j,k = 1 to 9
Borrower authority lists are the list codes that the user can use when creating or modifying various aspects of the borrower data. Whenever a drop down select list appears, it is utilising a borrower authority list.
After choosing this option the following form will be displayed:

This window asks you to select the borrower authority list to modify.
Note
The lists themselves can not be created by the library. These come with the system. If you want another list added, you need to contact Infor.
Once a list is selected the following form appears. There are three columns in the display: Wording, Code and "In use". Wording refers to the data displayed in the select list and is dependant upon the current language you are using. Code is the code that is inserted into the borrower record. “In use” indicates whether or not to display the value in the select list:

: If you select the "create new entry" icon the following form appears. The name given is the data that will be inserted. Once a unique name is given, a blank record entry screen is displayed.

Enter a code or click on to have the system generate one.
If you click an entry, the modify record form appears. Data appears as a Marc type record as shown by the following screen. The value entered in the 100 tag for the various languages is the wording used in the select list. The value entered in the 600 tag indicates whether to display the value in the select list or not. Note only 1 or 0 is valid.

:Select a code and then this option to modify the code.
:Select a code and then this option to delete the code.
Note
One of the standard authority lists is ‘Language'. This can be used for statistical purposes as well as for notice production. Currently supported languages for notice production are: Dutch, English, German, French, Spanish, Romanian, Papiamento. If the standard 3-letter code for any of these languages is entered in a borrower record, the notice for that borrower will be sent in the appropriate language. In order for this to work, the code must actually be the international 3-letter abbreviation for the language in question (although what you see in the borrower record is the wording). I.e. it will not work if your authority list uses: CODE = 1, wording = English; CODE = English, wording = English; CODE = en, wording = English etc.
The Borrower definition settings define how data is entered into the borrower record. All information relating to the borrower is contained in these fields so you must ensure that you define all those you wish to use.
The data may just be used for display purposes, or for contacting the borrower and sending out notices. The borrower category determines the borrowing privileges of the borrower. Some fields are used for management information purposes, such as Ethnic origin or Statistical category.
Once you have decided which fields you want to be included in the borrower record you must then decide which fields you want to be presented when you register a new borrower, and which fields can be modified by the user.
In order for a group to be visible on the Borrower Detail screen, and for setting the parameters Data to be entered and Data to be modified, you must set it to be In use = Yes.
After choosing this option, an overview screen will be displayed with codes already defined:

: Select a code and click this icon to view the fields belonging to this group.
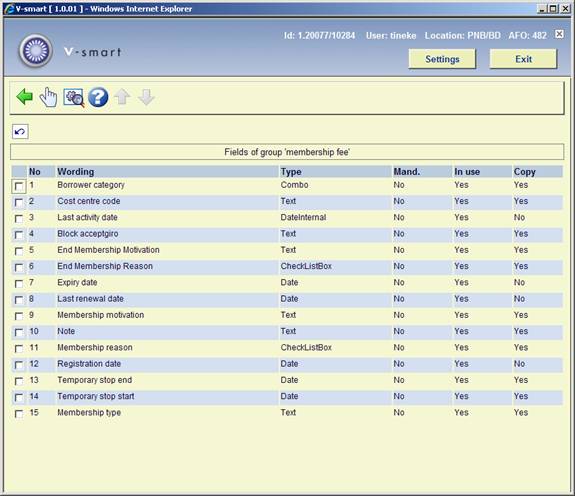
: Select a code and click on this icon to view the properties of that field.
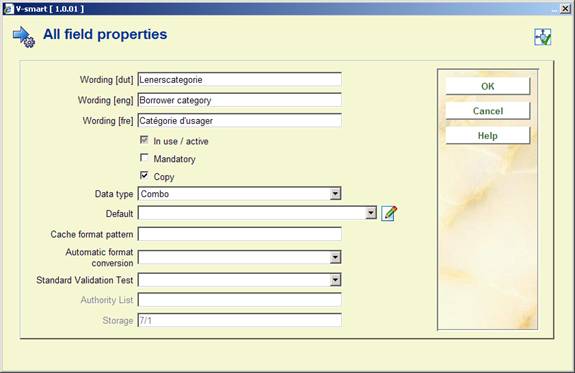
· Enter the wording you want for the field
· Check the In use/active check box
· Check the Mandatory check box if you want this field to be filled in for every borrower
· Check the Copy field if you want the data in this field to be copied to a new borrower record when you use the Copy Borrower function
· Select a Data type from the drop-down box. The default is Text.
Caution: if you want to change the Data type please contact Infor for advice.
· You can enter default data that will be filled in for the field for each new borrower.
· Cache Format Pattern is any valid Cache Object Script pattern
· Select an option from Automatic format conversion (not mandatory)
· Select a Standard Validation Test if applicable (You can ignore this option)
· If relevant you can an select an Authority List which is linked to the authority list behind the field
Note
Even if a field is set to In use/active then it is only displayed in the AFO 431 main display if the field contains data. It is only available for update if set in Data to be corrected.
: Select a code and click on this icon to set the code to “In use”. This option is the same on both screens.

· The In use/active checkbox will only be available if this field is not selected in the Data to be entered and Data to be corrected screens.
: This setting allows you to define (at a system level) which of the borrower record's 10 addresses will be copied during a ‘family' address change (see the help of AFO 431 for more information). A selection form is displayed:
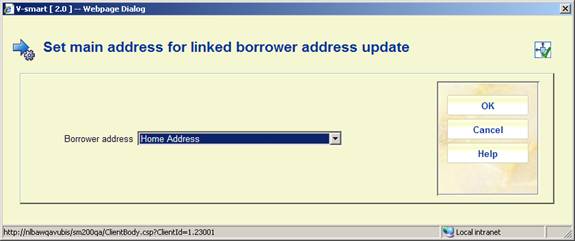
In this example, when the main borrower's Home address is changed, the system will attempt to update the home address of linked borrowers with the same information.
Please note
If you reset the default value for any field, it will only affect new records. Information in existing records need to be updated using Global change (via AFO 631).
Below is an explanation of all the fields available.
|
Group |
Field |
Explanation |
Mandatory |
|
Barcode |
Barcode |
The borrower barcode. |
Yes |
|
|
|
|
|
|
Locations |
Institution/location |
The institution / location combination where the borrower is registered. Used among other things to determine applicable circulation parameters. |
Yes |
|
|
Note |
A free text field that is for display only. |
|
|
|
Mobile stop |
To allow the borrower to be linked to a specific stop on the route of the mobile library van. |
|
|
|
Other locations |
Allows for listing of additional locations in the borrower record. There is no functionality behind this display. |
|
|
|
|
|
|
|
Identity |
Identification 1-5 |
Can be renamed by the library to various types of identification documents (like passport, drivers licence, ID card etc.). For information purposes only. |
|
|
|
Borrower Type |
To distinguish between personal and institutional memberships. Can be linked to an authority list. |
|
|
|
Contact person |
For use with institutional memberships. Can be used in definitions for notices to borrowers ($$CONTACT). |
|
|
|
Date of birth |
This can be used in relation with certain parameters, such as check on valid age group for borrower category. |
|
|
|
Department |
A free text field that is for display only. Can be linked to an authority list. |
|
|
|
Fist name |
The borrower first name. |
|
|
|
Gender |
Is used with address variable $$LENAT to determine how borrower should be addressed ('Mr' or 'Mrs'). |
|
|
|
Note |
A free text field that is for display only. |
|
|
|
Initials |
The borrower initials |
|
|
|
Language |
To determine the language for correspondence with the borrower |
|
|
|
Last name |
The borrower last name. |
Yes |
|
|
Last name prefix |
Prefix for last name such as Dutch 'van' or French 'la'. |
|
|
|
Middle name |
Additional Christian names of the borrower. |
|
|
|
Nationality |
Can be linked to an authority list with country codes. This is for information and reporting purposes only. |
|
|
|
Prefix/Title |
Specific prefixes such as 'Dr' |
|
|
|
Proof of identity |
To denote identification papers have been presented. |
|
|
|
Proof of identity by |
Free text field for name of staff member who viewed identity papers |
|
|
|
Suffix/title |
Specific suffixes such as 'Sr' |
|
|
|
|
|
|
|
Address
1-10 |
Place/city/town |
The 'city' part of the borrower address |
|
|
|
Correspondence |
Free text field to denote correspondence medium e.g. print, email. Optionally can be linked to an authority list. This is for information and reporting purposes only. |
|
|
|
Country |
The 'country' part of the borrower address. Optionally can be linked to an authority list. |
|
|
|
Department |
Free text field to denote department, e.g. in case of work address. Optionally can be linked to an authority list. |
|
|
|
Discipline |
Free text field to denote e.g. type of study. Optionally can be linked to an authority list. This is for information and reporting purposes only. |
|
|
|
District |
The 'district' part of the borrower address. Optionally can be linked to an authority list. |
|
|
|
|
The email address of the borrower. Can be used if sending notices via email is activated. |
|
|
|
Fax |
The fax number of the borrower. Can be used if sending notices via fax is activated. |
|
|
|
Line 1-5 |
These can be put to use and named according to the library's wishes. |
|
|
|
Mobile telephone |
The mobile telephone number of the borrower. Can be used if sending notices via SMS is activated. |
|
|
|
Note |
A free text field that is display only. |
|
|
|
Number |
A separate field for the (house) number part of the borrower address. |
|
|
|
Phone no. |
The telephone number of the borrower. |
|
|
|
County / State / Province |
The 'county' 'state' or 'province' part of the borrower address. Optionally can be linked to an authority list. |
|
|
|
Street |
The street name of the borrower address. This can include number if the separate number field is not used. |
|
|
|
Mail type |
Free text field to denote mail type. Optionally can be linked to an authority list. This is for information and reporting purposes only. |
|
|
|
Use address for |
If used, this field contains a series of 0's and 1's corresponding to fourteen output jobs (AFO 451). A 1 signifies that this address should be used for a particular job. List of 14 jobs is found in AFO482 –Borrower address priority setup |
|
|
|
Use from |
The start date from which this address must be used for mailings. Used in combination with Borrower address priority settings. E.g. to use a different address for students during holidays. |
|
|
|
Use until |
The end date after which this address must no longer be used for mailings. Used in combination with Borrower address priority settings. E.g. to use a different address for students during holidays. |
|
|
|
Postcode |
The 'postcode' part of the borrower address. |
|
|
|
|
|
|
|
Linked records |
Guarantor flag |
To denote if the borrower acts as guarantor for another borrower or borrowers. |
|
|
|
Related borrower ID |
The ID of the borrower to which the current borrower is linked (does not have to be guarantor) |
|
|
|
Note |
A free text field that is display only. |
|
|
|
Relation type |
To denote the type of relation between two borrowers. Must be linked to an authority list. |
|
|
|
|
|
|
|
Preferences |
Correspondence Braille allowed |
Used mainly by libraries for the blind to denote whether Braille correspondence is allowed. This is for information and reporting purposes only. |
|
|
|
Correspondence possible medium |
Used mainly by libraries for the blind to denote the possible types of correspondence. Optionally can be linked to an authority list. This is for information and reporting purposes only. |
|
|
|
Correspondence preferred medium |
Used mainly by libraries for the blind to denote the preferred medium for correspondence (out of all possible ones). Optionally can be linked to an authority list. This is for information and reporting purposes only. |
|
|
|
Loan history |
Flag to denote whether loan history must be kept for the borrower. If set the system will keep a history of items loaned by borrower. |
|
|
|
Customer type |
Used mainly by libraries for the blind to denote the type of membership for borrowers. Optionally can be linked to an authority list. This is for information and reporting purposes only. |
|
|
|
Disability |
Used mainly by libraries for the blind to denote the type of visual handicap. Optionally can be linked to an authority list. This is for information and reporting purposes only. |
|
|
|
Ethnic origin |
Used mainly by libraries for the blind to denote ethnic origin of borrowers. Optionally can be linked to an authority list. This is for information and reporting purposes only. |
|
|
|
Format |
Used mainly by libraries for the blind to denote specific formats. Optionally can be linked to an authority list. This is for information and reporting purposes only. |
|
|
|
Peripheral hardware |
Used mainly by libraries for the blind to denote peripheral hardware available. Optionally can be linked to an authority list. This is for information and reporting purposes only. |
|
|
|
Home Service budget code |
Used mainly by libraries for the blind to denote the budget code to be used for services. Optionally can be linked to an authority list. This is for information and reporting purposes only. |
|
|
|
Home service |
Used mainly by libraries for the blind to flag whether or not home deliveries are used. This is for information and reporting purposes only. |
|
|
|
ILL Budget status |
To denote whether or not borrowers can select a budget when placing an Interlibrary Loan request |
|
|
|
ILL Budgets |
Lists the budgets as defined in AFO 822 – ILL Budgets |
|
|
|
Interest topics |
Used mainly by libraries for the blind to denote topics borrower is interested in. Optionally can be linked to an authority list. This is for information and reporting purposes only. |
|
|
|
Method of delivery |
Used mainly by libraries for the blind to denote method of delivering materials to borrowers. Optionally can be linked to an authority list. This is for information and reporting purposes only. |
|
|
|
Occupation |
Used mainly by libraries for the blind to denote occupation of borrowers. Optionally can be linked to an authority list. This is for information and reporting purposes only. |
|
|
|
Qualifiers |
Used mainly by libraries for the blind to denote additional information of borrowers. Optionally can be linked to an authority list. This is for information and reporting purposes only. |
|
|
|
Religion |
Used mainly by libraries for the blind to denote religion of borrowers. Optionally can be linked to an authority list. This is for information and reporting purposes only. |
|
|
|
SCAT Statistical Category |
Categories used for gathering statistics. Optionally can be linked to an authority list. This is for information and reporting purposes only. |
|
|
|
Use loan history for mailings |
Flag to denote whether the loan history retained for borrowers can be used for mailings. E.g. to inform borrowers of new titles that are similar to the ones they have already loaned. |
|
|
|
|
|
|
|
Acceptgiro / bank |
Direct debit |
Flag to denote whether direct debiting is allowed for the borrower. |
|
|
|
Automatic invoicing |
Flag to denote whether automatic invoicing is allowed for the borrower. |
|
|
|
Data concerning acceptgiros |
Free text field for additional information related to acceptgiros |
|
|
|
Bank No |
The bank account number of the borrower |
|
|
|
Acceptgiro No. |
The giro account number of the borrower |
|
|
|
|
|
|
|
Linked from |
Backlink related borrower id |
The ID of the borrower from which the current borrower is linked |
|
|
|
Relation type |
To denote the type of relation between two borrowers. Must be linked to an authority list. |
|
|
|
|
|
|
|
Membership fee |
Borrower category |
The category of the borrower. This is used for the circulation policies (such as loans, renewals, fines etc.) |
|
|
|
Copyright tax |
To denote whether copyright tax has been paid. Must be linked to an authority list. |
|
|
|
Cost centre code |
A free text field to denote a specific cost centre for membership related costs. This is for information and reporting purposes only. |
|
|
|
Future borrower category |
A new borrower categegory which must be automatically applied on date <n> |
|
|
|
Start date future borrower category |
The date on which the new borrower category must replace the existing one |
|
|
|
Last activity date |
Adjusted for any of the following activities: Loan, Return, Renewal, Payment, Reservation, Deposit refund, payment from deposit, change to borrower data, Changes to additional borrower cards, Waive, Waive contribution |
|
|
|
Block acceptgiro |
Flag to denote sending of acceptgiros is not permitted. |
|
|
|
End membership motivation |
Free text field for information purposes. |
|
|
|
End membership reason |
A free text field to denote a specific reason for ending a membership. Optionally can be linked to an authority list. This is for information and reporting purposes only. |
|
|
|
Expriy date |
The date on which the membership expires. |
|
|
|
Date expiry notice sent |
The date on which a notice was sent to inform the borrower his/her membership is due to expire. |
|
|
|
Last renewal date |
The date on which the membership was last renewed. |
|
|
|
Membership motivation |
Free text field for information purposes. |
|
|
|
Note |
A free text field that is display only. |
|
|
|
Membership reason |
A free text field to denote a specific reason for becoming a member. Optionally can be linked to an authority list. This is for information and reporting purposes only. |
|
|
|
Registration date |
The date the borrower details were entered on the system. |
|
|
|
Temporary stop start |
Used to temporarily suspend the borrower's privileges. If set, system will display a message when the borrower is retrieved in AFO431, 411, 421, etc., warning that the borrower is temporarily inactive. |
|
|
|
Temporary stop end |
Used to temporarily suspend the borrower's privileges. If set, system will display a message when the borrower is retrieved in AFO431, 411, 421, etc., warning that the borrower is temporarily inactive. This field can be left blank for an indefinite suspension (if temporary stop start has a value). |
|
|
|
Membership Type |
Field related to membership types as defined in AFO 481 – Membership related – Membership Types. |
|
|
|
|
|
|
|
Block |
Registration date |
Date the block was created. |
|
|
|
Expiry date |
The expiry date selected for a manual block. |
|
|
|
Use expiry date |
Flag to denote the field expiry date must be used for manual blocks. |
|
|
|
Note |
A free text field related to a manual block that is display only. |
|
|
|
Status flag |
Flag to denote whether or not the borrower is blocked. |
|
|
|
System note |
The note associated with a system generated block. |
|
|
|
Blocked as guest member |
This parameters is stored at the home library and it means that the borrower can not do loans at any guest library. The flag can be set manually in AFO 431. |
|
|
|
|
|
|
|
Suspensions |
Suspension note |
The note associated with a system generated suspension. |
|
|
|
Registration date |
Date the suspension was created. |
|
|
|
|
|
|
|
Circulation note |
Note |
A free text field. Information in this field is displayed throughout the entire circulation module as soon as the borrower is identified. |
|
|
|
|
|
|
|
Maintenance note |
Note |
A free text field. Information in this field is only displayed in AFO 431. |
|
|
|
|
|
|
|
Outstanding membership fee |
Outstanding membership fee |
The amount of membership fee the borrower still owes. |
|
|
|
|
|
|
|
Local fields |
Optional field 1 – 20 |
These can be put to use and named according to the library's wishes. Optionally they can be linked to authority lists. This is for information and reporting purposes only. |
|
|
|
|
|
|
|
Loyalty program |
Loyalty card ID added on |
This field will be filled with the current date on registration, but can be modified |
|
|
|
Loyalty card ID |
The number of the loyalty card (no format test is applied) |
|
|
|
|
|
|
|
Guest loans |
|
These fields are part of the Physical Guest Loans functionality. They are set automatically by the system in the borrower record at the guest library. |
|
With this option you can control the content and format of the borrower name as it appears in various places within the application. Separate formatting is available for display, printing and indexing.
After choosing this option the following form will be displayed:

The column on the left contains the available fields that have not been selected. The column on the right contains the valid fields that have been selected. To add an entry to the selected list, select an entry in the left column and click the right arrow button (→). To remove an entry from the selected list: select an entry from the right column and click the left arrow button (←). To change the order of selected fields, select an entry from the right column and use either the up arrow button (↑) or the down arrow (↓) to move the entry before or after the other selected entries.
The valid name fields are: last name, last name prefix, first name, middle name, initials, last name prefix/title, suffix/title. Before a given field can be used it must be made available. Selecting the “Borrower Definition Settings” in AFO 482 does this. The fields are located in the “Identity” entry. For any entry you wish to use you must select an entry, make sure the “In use” checkbox is checked and save the changes.
The ‘Display' setting is also used to determine the display of a borrower name in the title bar, when the borrower is logged on to User Activities in the WebOpac.
The 'Print' setting allows you to define punctuation characters for the printed form of a name. For example:
· Setting:

· Borrower:
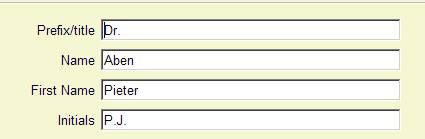
· Result: [Dr.] Pieter (P.J.) Aben
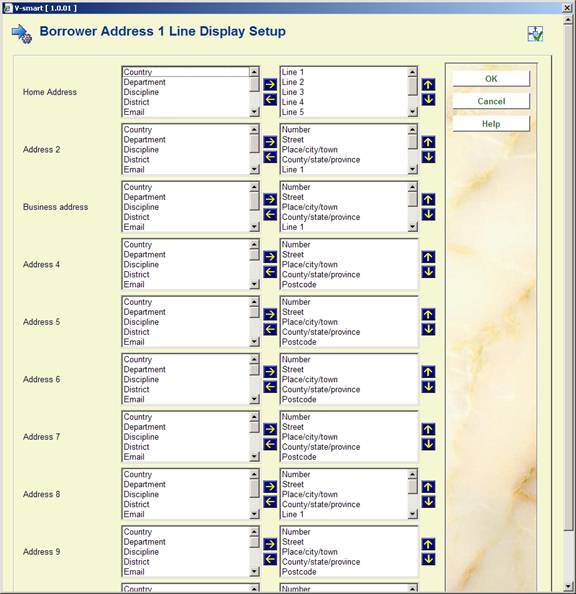
The library can define up to ten addresses for the borrower. Each of these addresses is given a name (i.e. Home Address, Address 2, Address 3, etc) and within each address, the library chooses which fields are “in use” – see the Borrower Definition Settings section for more details. For each borrower address that the library uses, the library can define which fields appear in the address and how these fields are formatted.
After choosing this option the following form will be displayed:

The form above includes each of the borrower address groups that is “in use” by the library. In this example, all addresses are “in use”. For each group, the middle column shows the fields that are “in use”. These are the fields that the user can choose for the address print. To select a field, highlight it in the middle column and then push if over to the right hand column. Use the up and down arrows to change the order in which the fields display. When the fields have been selected for each address, press the button. The following form appears.
On this form, each of the selected fields appears within angle brackets. Do NOT remove the angle brackets from the field names.
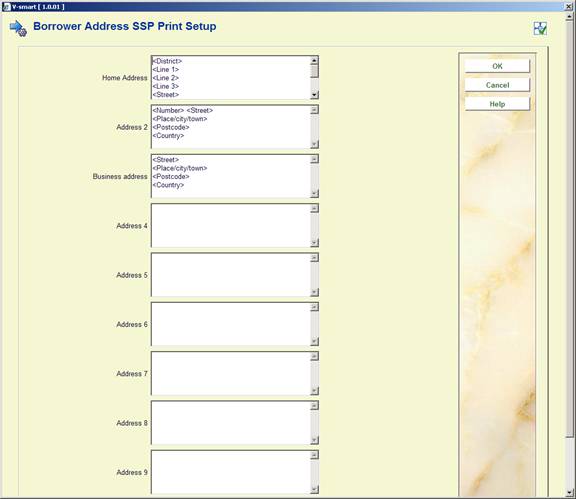
“Borrower Address SSP Print Set-up” is used to set-up the way the address will be printed on all SSP notices and card format notices (overdue, reservations, manual/automatic recalls). This type of set-up allows multi line address printing. What you see in design mode is what will be printed.
· For instance:
- <Line 1>
- <Line 2>
- <Line 3>
- <Line 4>
- <Line 5>
- <Place/city/town>, <District>
- <Postcode>
- <Country>
See the section on Borrower Address SSP Print setup for a general explanation of this feature.
After selecting this option the following screen will be displayed:

The form above includes each of the borrower address groups that is “in use” by the library. For each group, the middle column shows the fields that are “in use”. These are the fields that the user can choose for the address print. To select a field, highlight it in the middle column and then push if over to the right hand column. Use the up and down arrows to change the order in which the fields display. When the fields have been selected for each address, press the OK button. The following form appears.

In this set-up only three lines can be defined. The first line will be the street, the second line will be the city and the third line will be the postcode.
· For instance:
- <Street>
- <Place/city/town>
- <Postcode>
· On each line you can define more than one element. For instance:
- <Line 1> <Line 2>
- <Place/city/town>, <District>
- <Postcode>
The Borrower address priority set-up is used to determine which borrower address should be used for each system job. There are various system jobs that generate output for borrowers: Overdue 1 through 4, Reservations, the Accept/Giro jobs, etc. At the system level, for each of the jobs, the library chooses which borrower address should be used for correspondence and whether the guarantor's address (if found) should be used. The address priority set-up is also defined at the Borrower Category level. For each Borrower category, the library can choose, for each of the system jobs, which borrower address should be used for correspondence.

Selecting ‘System level set-up' results in the display of the following for:

For each job, the library can select which address should be used in correspondence. Also, if guarantors are used, the library can decide to override the borrower's address with that of the guarantor for specific jobs. For example, the library might choose to send the 3rd overdue notice to the guarantor's address.
Addresses can be set for: overdues 1-4, reservations, acceptgiro's plus overdues, automatic & manual recalls, acceptgiro's for invoices, direct debits, invoices, collection agency.
The set-up for a specific Borrower category, if done, overrides the more general system settings.
· Logic for determining which address to use:
- The system will check the address set-up at the system level to determine which address to use at the system level for the specific job.
- The system set-up will be checked in order to see if this job uses the guarantor. If this job uses the guarantor and the borrower has a guarantor, the system will switch to the guarantor's borrower record. If the borrower does not have a guarantor, the system will stay in the borrower's record.
- The system will check if there is an address set-up at the borrower category level. If there is, the system will use this set-up to determine which address to use for this job.
- If this address has “Use from” or “Use until” fields set, it will be checked to make sure that the selected address falls into the correct date range and also it will be checked that the “Use address for” field allows the use of this address for the specific job (if null, address can be used for anything). If this address is valid, starting from this address, the system will determine if there is another address that better qualifies for use (is “Use from” date after previous addresses but before today's date). If no other address better qualifies for use, this address will be used. If this address is invalid, the system will start at the first address in the borrower record in order to find the address that qualifies best. If no address qualifies, the first address in use will be used.
In the left hand column all address groups in use are displayed.
After choosing this option the following form will be displayed:
· The fields that should be part of the 1 line address display can be moved to the right. The order of the fields can be modified by using the up and down arrows.
In AFO 481 – Misceallaneous – Circulation workflow - Borrowers, the field Borrowers address display sequence specifies which address group is displayed and in which order; where 3,2,1 means: display address 3 if not defined, use address set 2 if not defined use address 1.
The data elements which are displayed for this address group and the order in which they are displayed is defined here.
In AFO 431, Borrower Administration you have the option to create additional cards for a borrower record. The maximum number of additional cards that can be added is limited by this parameter
After choosing this option the following form will be displayed:

· Enter the maximum for each borrower category.
Note
If nothing has been defined, no additional cards can be created. The relevant button will be inactive on the screen in AFO 431, Borrower Administration.
· In case there are more than 15 borrower categories, there will be a button to go to the next screen.
· The button allows you to go directly to a specific borrower category.
You can create age groups and relate these to one or more borrower categories. If a borrower category is changed in AFO 431 the system will check the valid categories that correspond to the age of the borrower. If the borrower category is not valid, an error message is displayed. If a borrower category is changed in AFO 431 the system will check the valid categories that correspond to the age of the borrower. If the borrower category is not valid, an error message is displayed.
After choosing this option the following form will be displayed.
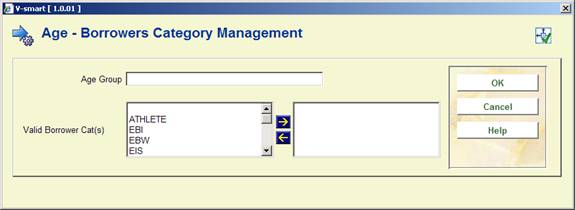
· Add an age group and move the valid category to the right.
If the table contains no entry at all, no age check will be done.
Ages that do not fall in any of the defined age groups have no restrictions on borrower category (i.e. all categories are valid).
Example table:
|
Age group |
Valid categories |
Comments |
|
0-4 |
A,B,C |
|
|
4-12 |
D,D2 |
|
|
13-17 |
E,F,G,H |
|
|
18-64 |
I,J,K,L |
|
|
65-999 |
I,J,M |
Note that borrower categories may appear in multiple age groups (I and J also appear in the previous age group) |
|
* |
X,Y,Z |
No date of birth in the borrower record |
|
+ |
T1,T2 |
Categories that are valid in all cases, independent of whether they figure in age groups. This parameter takes precedence over age related parameters. |
|
- |
T3 |
Categories that are invalid in all cases, independent of whether they figures in age groups. This parameter takes precedence over age related parameters. |
Note
When the system is configured is such a way that an age can fall in multiple categories, the internal global will contain the result of an OR operation. Example:
· The age categories
- 0-4 – category A,B,C
- 0-6 – category C,D,E,F
· correspond to the following ages:
- 0 – A,B,C,D,E,F
- 1 – A,B,C,D,E,F
- 2 – A,B,C,D,E,F
- 3 – A,B,C,D,E,F
- 4 – A,B,C,D,E,F
- 5 – C,D,E,F
- 6 – C,D,E,F
When codes have already been defined, an overview screen will be displayed:

: Select this option to enter a new code. When you select this option, an input screen will be displayed. This screen is explained above.
:Select a code and then this option to modify the code.
:Select a code and then this option to delete the code.
Note
This parameter has no relation to any other age category related parameters.
If your library is set up to generate pincodes from date of birth, you can use this option to automatically generate pincodes based on date of birth for borrowers without pincodes when you leave the borrower's record in AFO 431. These parameters are set at the metaInstitution level.
After choosing this option the following form will be displayed:
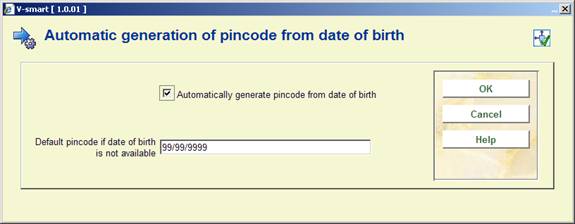
Automatically generate pincode from date of birth: set this flag if you wish to automatically generate pincodes when you leave the borrower's record in AFO 431. This flag should only be set if your library generates pincodes from the date of birth field.
Default pincode if date of birth is not available: enter either a valid date or 99/99/9999.
If the automatic generate flag is set and your PIN generation is based on DateOfBirth and the borrower does not already have a PIN code, the system will automatically generate a pincode (using either the borrower's date of birth or the default in defined above) when you leave the borrower's record.
Pincodes may also be automatically generated for borrowers entered through the WebOpac.
If you have selected to display the district code for the Data to be entered and Data to be corrected options in AFO 482, a dropdown list will be displayed when adding/modifying a borrower record. This parameter determines what the dropdown list looks like
After choosing this option the following form will be displayed:

District display includes: choose a format from the dropdown list. There are four options:
- only code
- only wording (gives nothing if district is not in authority)
- code followed by wording
- wording followed by code
Punctuation between code and wording: When you choose option 0 or 1 you can specify here what the punctuation between code and wording must be.
These parameters are stored at the Circulation metainstitution level. Multiple collection agency codes may be set up for each Circulation metainstitution.
After choosing the Collection agency codes option, a screen appears showing you all of the collection agency codes already set up for your Circulation metainstitution:

: choose this option to create a new code. See section 482.34.1.
: choose a code and then this option to modify the details. See section 482.34.1.
: choose a code and then this option to delete the code.
After choosing the or option an input form will be presented:

Collection code: a unique code for this collection agency. When updating an existing code, this field will be protected (i.e. once a code has been added, you can not modify the code itself).
Description: a brief description of the collection agency.
Locations to link: combo box showing list of institution/location combinations (including institution/* to select all locations for a specific institution). If an institution/location combination is already linked to another collection agency code, the list will not include this combination. Select a location and use the arrows to move it.
Exempt fee types: combo box showing list of fee types that are not collected by the collection agency. Select a fee type and use the arrows to move it.
Monetary threshold: If a Borrower's aged aggregate amount owed (see Aging and Grace period parameter below) equals or exceeds this value, the Borrower's bills and invoices will be sent to the Collection Agency for collection. The aggregate amount is calculated only from fee types not included in the Exempt fee types field.
Collection fee: On going to collection, an additional processing fee will be added to the existing invoices.
Aging parameter (in days): (i.e. 6 years = 2189). Invoices, fines and other payable amounts older than this criteria will be ignored.
Grace period (in days): (ignore current invoices within X days). Invoices, fines and other payable amounts more recent than this will be ignored.
Exempt borrower categories: list of borrower categories that are exempt (e.g.: Staff, Bankruptcy). Select a borrower category and use the arrows to move it.
Email address: enter the email address of the Collection Company to which reports must be sent.
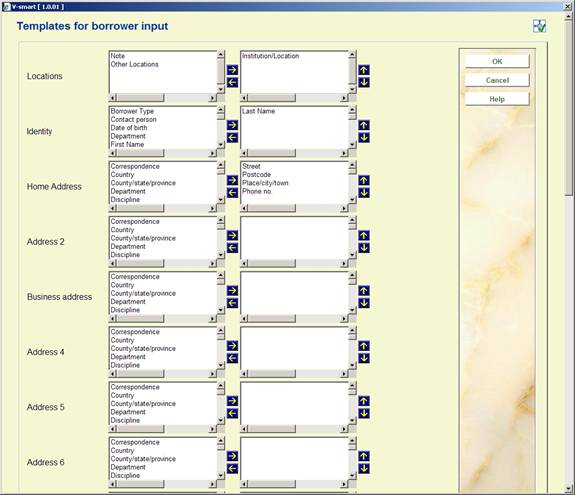
When enrolling a borrower in AFO 431, the user has the ability to select a template that will define the fields that will be included on the “Enter new membership…” form. These templates are maintained here.
After choosing this option an overview screen will be displayed:

: Choose this option to define a new code. See section 482.35.1.
: Select a code and choose this option to modify the details. See section 482.35.2.
: Select a code and choose this option to delete the code. The system will prompt for confirmation.
: Select a code and choose this option to modify the general properties. See section 482.35.2.
: Choose this option to define a new code. After choosing this option the following form will be displayed:

Template ID: Enter a unique code to identify the template.
Description: Free text field.
Default borrower category: Select a borrower category from the dropdown list. The dropdown list will contain only categories from AFO 482 – Borrower category maintenance that are In use.
In use: Check this box to make the template available when entering new borrowers in AFO 431.
After entering the data and clicking , the following form is presented:

· Select the fields on the left hand side
· Click the Right arrow to enter them for display.
· Use the Up and Down arrows to determine the order for display
You can select more than one field at a time.
After selecting the option the following form will be displayed:
see above for a description.
After selecting the option the following form will be displayed:

see above for a description. Note you cannot modify the Template ID of an existing code.
The company Cendris offers address check and postcode check services for addresses in the Netherlands.
Cendris has two webservices: "AdresXpress" and "AdresCheck":
· AdresXpress has as input: Postal code and house number; it returns the full address.
· AdresCheck has as input: Street name, house number and town; it returns the postcode.
Vubis supports 1 to 10 possible addresses for each borrower.
The matching between the Cendris fields and Vubis data is as follows:
|
Cendris field name |
(English translation of Cendris field) |
Vubis data |
|
username |
|
parameter in AFO 482 (see below) |
|
password |
|
parameter in AFO 482 (see below) |
|
straatnaam |
(street name) |
Street or part of Street (parameter in AFO 482) |
|
huisnummer |
(house number) |
Number or part of Street (parameter in AFO 482) |
|
woonplaats |
(town) |
Place/city/town |
|
netnummer |
(phone area code) |
- [we do not use this information] |
|
postcode |
(postal code) |
Postcode |
|
status (only AdresXpress) |
|
- |
|
match (only AdresCheck) |
|
- |
It is assumed that the fields Postal Code, Street and Place/city/town are used for what they say that they are used for.
Theoretically you can put any value in any field. If for example one uses Line1, Line2 etc. to store the address data, the Cendris Web Service won't work.
Please contact Infor if you want to use this functionality.
After selecting this menu option, an input form will be displayed:

In use: This is the general variable to switch on and off the address webservices. It is checked before every action. The default is OFF.
Internet address of the server: This is the Internet address of the server.
Post address of the server: This is the address of the http post on the server.
User name: This is the information sent to Cendris Webservice in the field "username".
Password: This is the information sent to Cendris Webservice in the field "password".
Where is the house number: Use this to specify in which part of the borrower address the house number is stored.
Show option postal code check: Use this option to specify what must happen in AFO 431.
Show option address check: Use this option to specify what must happen in AFO 431.
Automatic check: Perform automatic check in AFO 431.
The automatic check is performed when clicking the button on the borrower entry/update form. So in this case, the specific buttons for the address webservice are not needed.
Automatic update: Perform automatic update after modifying the data.
If not, the form is shown again with the new data retrieved from the Web Service.
Bulk check method: Method used for the bulk check on a borrower savelist in AFO 141.
Bulk check: Automatic update. The default is OFF. If this option is OFF, the bulk check only reports about errors. If this option is ON, the borrower records in the database are updated.
AFO 434 allows for the registration of “contacts” with borrowers. These “contacts” are stored “on top of” contact moments that are automatically registered when a borrower is involved in a transaction in the circulation module (e.g. when he checks out an items, pays a fine, etc.). These contacts can be face-to-face, by telephone, via email, via letters, or through any other type of communication. The contacts can be of multiple types. The contacts can be registered without any follow-on, but can also lead to follow-on actions that need to be taken. An example of the latter case is when a borrower reports an issue that needs to be dealt with.
AFO 434 can be used to register visits, meeting attendance, complaints, questions or any other type of “contacts” between the borrower and the library.
Contacts are registered as contact incidents, which can consist of one or more contact events. As such a contact incident has a two level structure: (1) the main contact incident level, and (2) the contact instance level. The second level is repeatable.
The main contact incident level contains the information that describes the incident in general. Properties on this level are: status, category, description, etc. The contact instance level contains information for each subsequent contact event related to the main contact incident (e.g. each event that is related to the contact incident). In other words: the contact instance level is a chronological string of contacts related to the initial contact incident.
The following system functionality is supported:
·
ability to register a contact incident and the associated “events”
·
storage of related emails and documents
·
a tracking system for follow-up of actions
·
a reporting function to extract incidents
·
email capabilities.
This functionality can be accessed via AFO 431 with the option , in which case only information for a particular borrower is displayed.
Alternatively the functionality can be accessed via AFO 434, in which case information for all borrowers with contact incidents is available as well as the option to add additional incidents for borrowers.
The parameters related to this functionality are set in this section.
After selecting this menu option a sub menu is displayed:
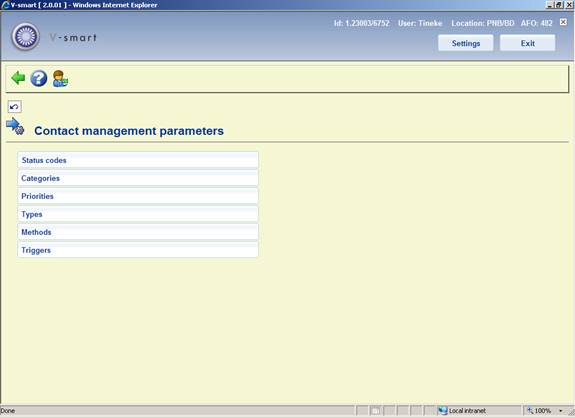
The options are described in the next paragraphs.
After selecting this menu option, an overview screen is displayed:

: Use this option to add a new status code. See section 482.37.1.1.
: Select a line and then this option to view / modify the details of an existing code. See section 482.37.1.1.
: Select a line and then this option to delete the selected code. The system will prompt for confirmation.
After selecting the option or an input form will be displayed:
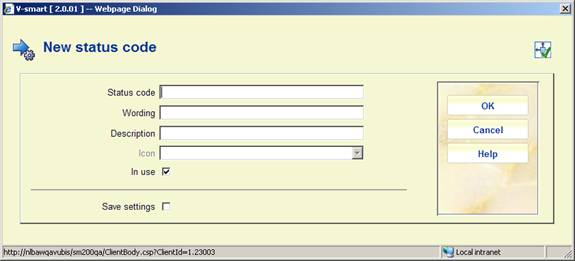
Status code: A unique code identifying the status.
Wording: A brief description of the code. This will appear in the Status column in AFO 434 as well as in the dropdown list for assigning statuses in AFO 434.
Description: Additional information about the code that will only appear here.
Icon: A standard status icon can be selected to add to the code. This will appear in the left hand column of the overview screen in AFO 434.
In use: To denote whether the code is currently in use or not.
Notes
·
The user-defined statuses can be used on top of the default system statuses.
·
User-defined statuses that are not in use cannot be attributed to incidents.
·
It is NOT mandatory to define these parameters.
After selecting this menu option, an overview screen is displayed:

: Use this option to add a new category code. See section 482.37.2.1.
: Select a line and then this option to view / modify the details of an existing code. See section 482.37.2.1.
: Select a line and then this option to delete the selected code. The system will prompt for confirmation.
After selecting the option or an input form will be displayed:
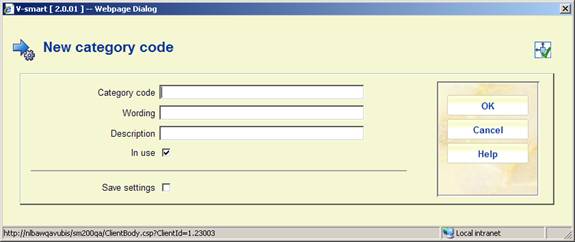
Category code: A unique code identifying the category.
Wording: A brief description of the code. This will appear in the Category column in AFO 434 as well as in the dropdown list for assigning categories in AFO 434.
Description: Additional information about the code that will only appear here.
In use: To denote whether the code is currently in use or not.
Notes
·
Categories that are not in use cannot be attributed to incidents.
·
To be able to work with the Contact incident management, at least one category that is in use must exist. If this is not the case, a message will appear in the management of contact incidents, pointing out that the system is not configured correctly.
After selecting this menu option, an overview screen is displayed:
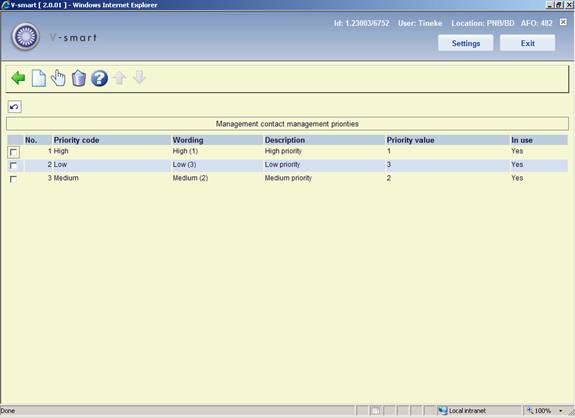
: Use this option to add a new priority code. See section 482.37.3.1.
: Select a line and then this option to view / modify the details of an existing code. See section 482.37.3.1.
: Select a line and then this option to delete the selected code. The system will prompt for confirmation.
After selecting the option or an input form will be displayed:
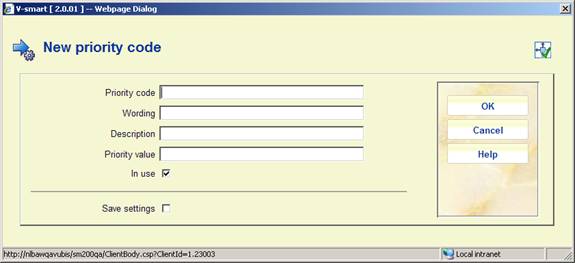
Priority code: A unique code identifying the priority.
Wording: A brief description of the code. This will appear in the Priority column in AFO 434 as well as in the dropdown list for assigning priorities in AFO 434.
Description: Additional information about the code that will only appear here.
Priority value: This field is for future use.
In use: To denote whether the code is currently in use or not.
Notes
·
Priority codes that are not in use cannot be attributed to incidents.
·
It is NOT mandatory to define these parameters. If no priorities are defined, the system will automatically attribute the priority 1 to an incident.
·
Default priorities can be linked to an Incident Type.
·
Priorities that are in use as the default priority for an Incident Type cannot be set to Not in use. Priorities that are attached to existing contact events can be set to Not in use.
· The assumption is that 1 is the highest priority.
After selecting this menu option, an overview screen is displayed:
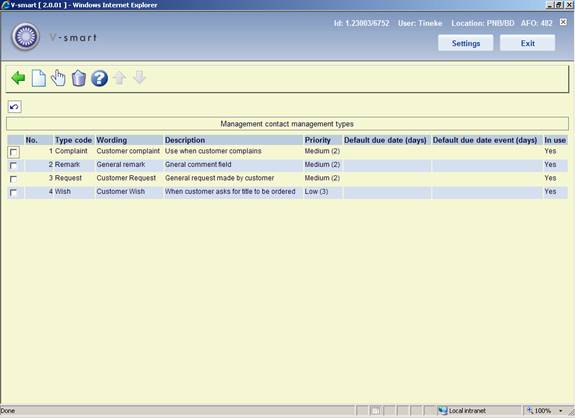
: Use this option to add a new type code. See section 482.37.4.1.
: Select a line and then this option to view / modify the details of an existing code. See section 482.37.4.1.
: Select a line and then this option to delete the selected code. The system will prompt for confirmation.
After selecting the option or an input form will be displayed:

Type code: A unique code identifying the type.
Wording: A brief description of the code. This will appear in the Type column in AFO 434 as well as in the dropdown list for assigning priorities in AFO 434.
Description: Additional information about the code that will only appear here.
Priority: Select a default priority for the type from the dropdown list. This can be mdofied when assigning the code in AFO 434.
Default due date (days): Enter a default due date for the type [the number of days that is defined as the period in which the incident should be closed].
Default due date event (days): Enter a default due date for an event attached to an incident of this type [the number of days that is defined as the period in which the event should be “closed” – the latter implies in fact that either the event is closed or a new (next) event is created].
In use: To denote whether the code is currently in use or not.
Notes
· All properties, with the exception of the Type description, are mandatory.
· Types that are not in use cannot be attributed to incidents.
· To be able to work with the Contact incident management, at least one type that is in use must exist. If this is not the case, a message will appear in the management of contact incidents, pointing out that the system is not configured correctly.
After selecting this menu option, an overview screen is displayed:
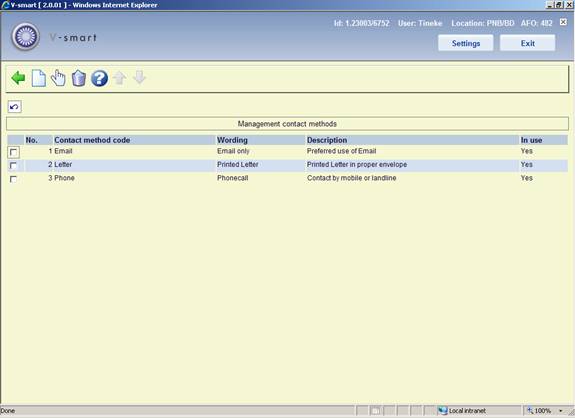
: Use this option to add a new method code. See section 482.37.5.1.
: Select a line and then this option to view / modify the details of an existing code. See section 482.37.5.1.
: Select a line and then this option to delete the selected code. The system will prompt for confirmation.
After selecting the option or an input form will be displayed:
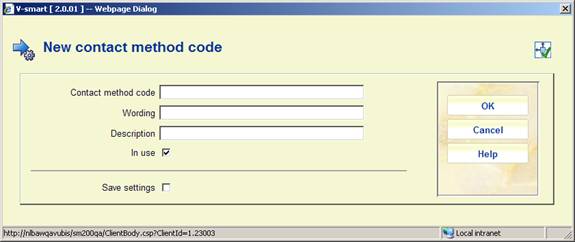
Contact method code: A unique code identifying the contact method.
Wording: A brief description of the code. This will appear in the Type column in AFO 434 as well as in the dropdown list for assigning types in AFO 434.
Description: Additional information about the code that will only appear here.
In use: To denote whether the code is currently in use or not.
Notes
·
Methods that are not in use cannot be attributed to incidents.
·
To be able to work with the Contact incident management, at least one method that is in use must exist. If this is not the case, a message will appear in the management of contact incidents, pointing out that the system is not configured correctly.
The following parameters are used by the trigger batch process. The trigger parameters are defined as rules. None, one or more rules can exist on a single system.
Each rule is defined for a combination of event type and receiver. The rule properties are linked to the type/receiver combination. These combinations define the scope of the rule and can have the following formats:
|
* |
general rule |
applies to all event types and all receivers |
|
type/* |
rule for a specific event type |
applies to a specific event type but to all receivers |
|
type/receiver |
rule for the combination of a specific event type and a specific receiver |
applies to the specific combination of an event type and a receiver |
After selecting this menu option, an overview screen is displayed:

: Use this option to add a new trigger code. See section 482.37.6.1.
: Select a line and then this option to view / modify the details of an existing code. See section 482.37.6.1.
: Select a line and then this option to delete the selected code. The system will prompt for confirmation.
: Use this option to process the triggers. The system will swicth to the standard screen for executing processes.
After selecting the option or an input form will be displayed:

Trigger code: A unique code identifying the trigger.
Scope: As described in the above table; the scope must be unique for the rule, i.e. the same scope can only be attached to a single rule, independent of the fact that the rule is or is not in use.
Report to: Select the required user name(s) from the list.
Report to incident owner: When this is checked the owner of the incident will be notified something needs to be done.
Report to next action owner: When this is checked the owner of the next action will be notified something needs to be done.
Timing: Trigger action timing [x1,x2,x3,…xm] [in which x[1:1:m] = -n:1:0:1:n].
Email: When this is checked the owners will be notified via email.
Description: Additional information about the code that will only appear here.
In use: To denote whether the code is currently in use or not.
· Document control - Change History
|
Version |
Date |
Change description |
Author |
|
|
1.0 |
June 2008 |
creation |
|
|
|
1.1 |
August 2008 |
replaced some screen shots; new options for post code maintenance |
|
|
|
2.0 |
October 2009 |
improved variosu explanantions; punctuation for borrower addresses; expiry date parameter; new menu options for Web service borrower address and Contact management |
|
|
|
3.0 |
July 2010 |
new option for address changes for related borrowers; various clarifications; new fields for ILL |
|
|